


Affiliate disclosure: This article contains affiliate links. If you click and purchase, we may earn a commission at no extra cost to you.
Table of Contents
◉Introduction ◉Reader Roadmap ◉What Is the Adobe Creative Cloud Cleaner Tool (and Why It Exists) ◉When You Should (and Should NOT) Use the Cleaner Tool ◉Step-by-Step: How to Run Adobe Creative Cloud Cleaner Tool ◉Practical Example: Fixing a Creative Cloud Install Loop ◉Common Mistakes and How to Fix Them ◉FAQs ◉Final Checklist and Next Steps ◉Sources
Introduction
If Adobe Creative Cloud refuses to install, apps crash on launch, updates fail endlessly, or licensing errors won’t go away, you’re likely dealing with corrupted Adobe components—not a simple bug. This is where the Adobe Creative Cloud Cleaner Tool becomes essential.
Don’t have Adobe Creative Cloud yet?
Get Adobe Creative Cloud so you can follow this tutorial step by step with the official apps, installers, and account access.
Get Adobe Creative CloudThis tutorial is written for U.S.-based professionals—designers, marketers, developers, IT admins, and power users—who need a clean, reliable reset of Adobe software without guesswork. You’ll learn when to use the Cleaner Tool, how to run it safely step by step, and what to do next to ensure a stable reinstall.
Unlike short videos or forum snippets, this guide goes deeper: you’ll understand what the tool actually removes, common mistakes that cause repeat failures, and how to decide whether a full cleanup is truly necessary. By the end, you’ll have a repeatable process you can use on your own machine—or across a team.
Prerequisites:
• Administrator access on your computer
• A stable internet connection
• All Adobe apps fully closed before starting
Reader Roadmap
Here’s how this guide is structured and why each section matters:
• What the Cleaner Tool does (and doesn’t) — avoid accidental data loss
• When you should and should not use it — prevent unnecessary resets
• Step-by-step instructions for Windows and macOS — no skipped steps
• Practical example scenario — see how it solves real-world issues
• Common mistakes and troubleshooting — fix what usually goes wrong
• FAQs and next-step checklist — reinstall with confidence
What Is the Adobe Creative Cloud Cleaner Tool (and Why It Exists)
The Adobe Creative Cloud Cleaner Tool is an official utility provided by Adobe to remove corrupted, conflicting, or partially installed Adobe components that standard uninstallers can’t fully clean.
This includes:
• Broken Creative Cloud Desktop installations
• Failed or incomplete app installs (Photoshop, Premiere Pro, After Effects, etc.)
• Residual licensing services causing sign-in or activation errors
• Old Adobe software remnants blocking new versions
What it does not do:
• It does not delete your personal files (PSD, AI, MP4, etc.)
• It does not bypass licensing or subscriptions
• It does not “optimize” performance by itself
Think of it as a last-resort reset tool, similar to using a clean driver uninstall utility on Windows or a package purge on macOS.
When You Should (and Should NOT) Use the Cleaner Tool
Use it when:
• Creative Cloud Desktop won’t open or update
• Adobe apps fail to install with repeated error codes
• Licensing errors persist after sign-out and reinstall
• You’re migrating from very old Adobe versions
• An IT-managed machine has broken Adobe services
Do NOT use it when:
• A single app crashes occasionally (try updates first)
• You just want to free disk space
• You’re unsure which Adobe products you still need
• You haven’t backed up custom presets or plugins
Important: This tool is destructive at the system level. Use it deliberately, not casually.

Fix install loops faster with a clean Creative Cloud setup
Get Adobe Creative Cloud access so you can reinstall the desktop app cleanly, sign in correctly, and restore stable updates after running the Cleaner Tool.
Get Adobe Creative CloudStep-by-Step: How to Run Adobe Creative Cloud Cleaner Tool
Step 1: Close All Adobe Processes
Before doing anything else:
• Quit all Adobe apps (Photoshop, Illustrator, Premiere, etc.)
• Exit Creative Cloud Desktop
• On Windows, check Task Manager for Adobe background services
• On macOS, check Activity Monitor
This prevents locked files that can break the cleanup.
This image shows Adobe apps fully closed, which is critical to avoid cleanup errors.
Step 2: Download the Tool from Adobe (Official Source Only)
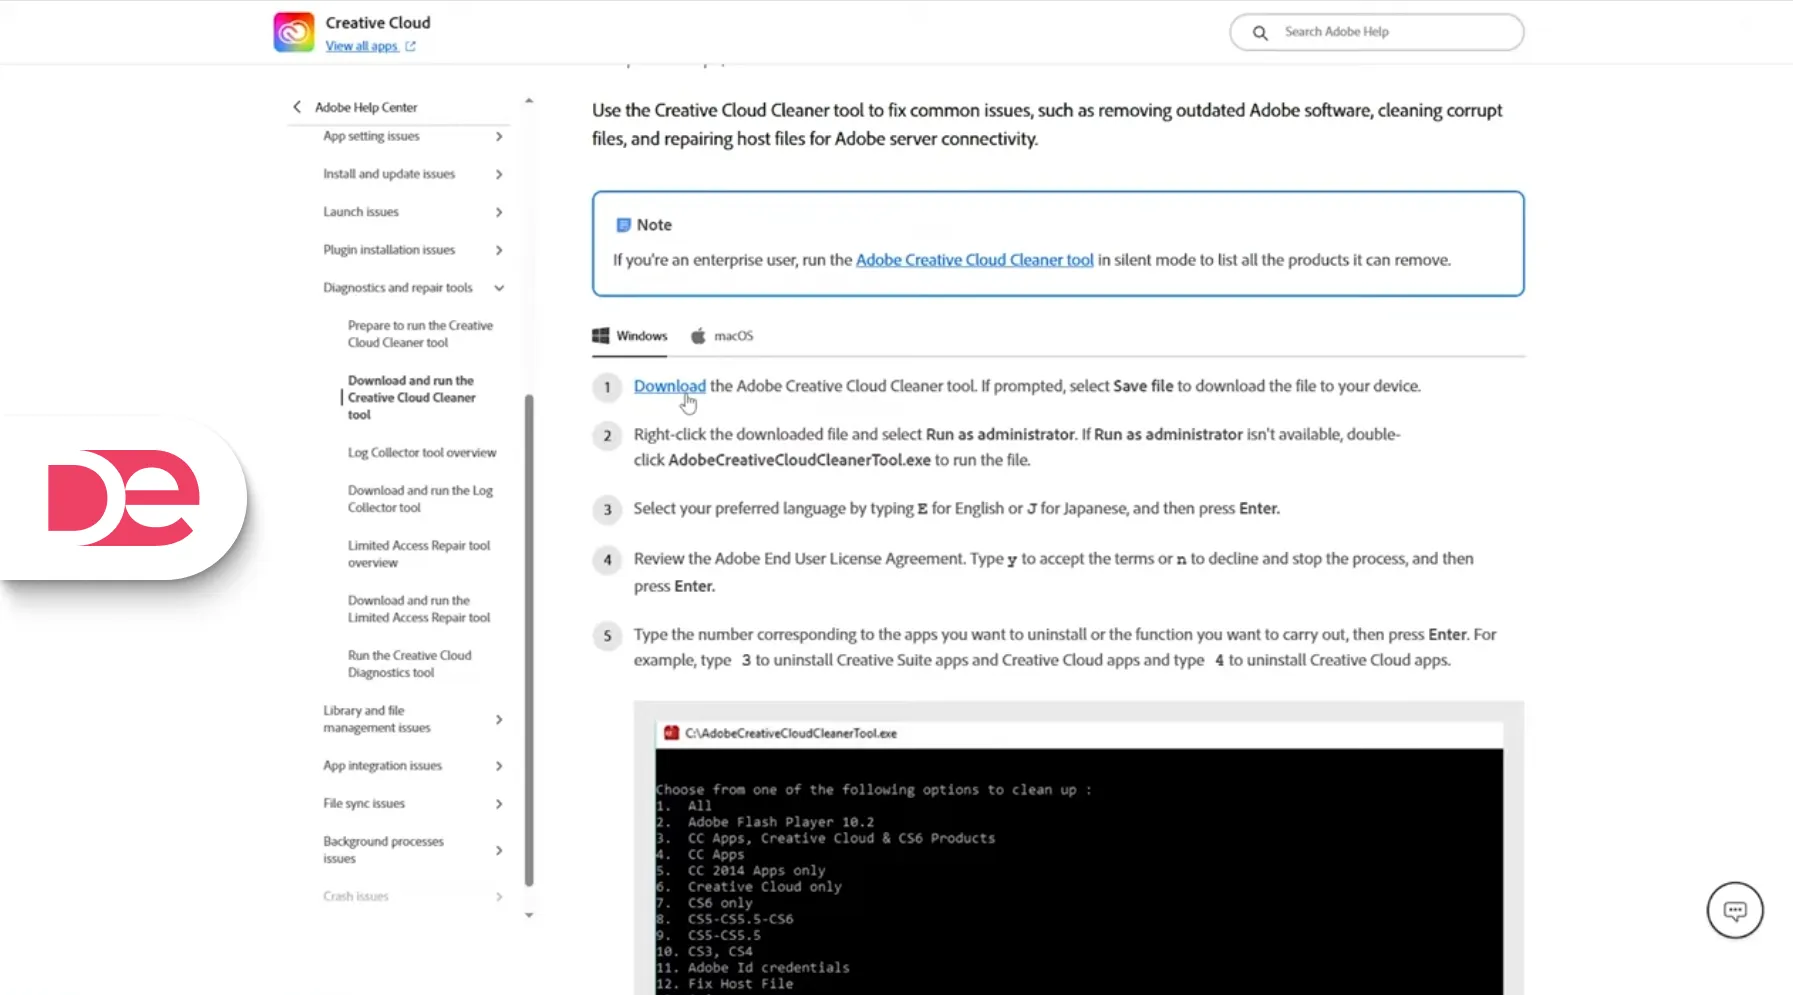
Always download the Cleaner Tool from Adobe’s official help documentation. Avoid third-party download sites.
You’ll receive:
• A .exe file on Windows
• A .dmg or shell-based tool on macOS
Save it somewhere easy to find, like your Desktop.
Step 3: Run as Administrator (Critical)
On Windows:
• Right-click the Cleaner Tool file
• Select Run as administrator
• Approve the User Account Control prompt
On macOS:
• Open the tool from Finder or Terminal
• Enter your macOS admin password when prompted
Skipping admin privileges is the #1 reason the tool “does nothing.”
This image highlights the Run as Administrator option, which is mandatory.
Step 4: Choose Language and Accept Terms
The tool runs in a command-line interface (CMD or Terminal).
You will:
• Select your preferred language
• Accept Adobe’s terms by typing Y and pressing Enter
This step is required to proceed—there is no graphical UI.
Step 5: Select What You Want to Clean

You’ll see a numbered list of cleanup options, such as:
• All Adobe Creative Cloud products
• Individual apps (Photoshop, Illustrator, etc.)
• Legacy components like Flash Player
• Creative Cloud Desktop only
Best practice:
• For major issues, choose Clean All
• For targeted fixes, select only the affected product
You’ll be asked to confirm your selection by typing the same number again.
This image shows the text-based menu where you select which Adobe components to remove.
Step 6: Confirm Removal and Let the Tool Finish

After selection:
• Confirm deletion by typing Y
• Wait for the process to complete (1–5 minutes typically)
Do not interrupt the tool while it’s running.
Step 7: Restart Your Computer (Non-Negotiable)
Restart immediately after the tool finishes.
This ensures:
• Adobe services are fully unloaded
• Registry/system references are cleared
• The next install starts from a clean state
Skipping the restart often causes reinstall failures.
Practical Example: Fixing a Creative Cloud Install Loop
Scenario:
A marketing team member can’t update Creative Cloud. Every update fails at 87%, and Photoshop refuses to launch.
What didn’t work:
• Standard uninstall
• Reinstalling Creative Cloud Desktop
• Signing out and back in
What worked:
• Running Cleaner Tool as admin
• Selecting “Clean All”
• Restarting
• Reinstalling Creative Cloud fresh
Outcome:
Clean install, apps launch normally, updates succeed.
This pattern is extremely common in enterprise and freelance environments.
Common Mistakes and How to Fix Them
Mistake 1: Adobe Apps Still Running
Symptom: Cleanup fails silently or partially
Fix: Recheck Task Manager / Activity Monitor before running
Mistake 2: Not Using Administrator Mode
Symptom: Tool runs but doesn’t remove anything
Fix: Always run as admin/root
Mistake 3: Skipping the Restart
Symptom: Reinstall errors persist
Fix: Restart immediately after cleanup
Mistake 4: Cleaning Without a Reinstall Plan
Symptom: Missing apps and confusion
Fix: Know exactly what you’ll reinstall next
FAQs
Final Checklist and Next Steps
Before reinstalling Adobe Creative Cloud, confirm:
• All Adobe apps were closed
• Cleaner Tool ran as administrator
• Correct cleanup option was selected
• System was restarted
Next steps:
• Download Creative Cloud Desktop fresh
• Sign in with your Adobe ID
• Install only the apps you actually need
• Apply updates immediately
This approach minimizes future corruption and saves hours of troubleshooting.
Sources
• Adobe Help Center — Creative Cloud Cleaner Tool
https://helpx.adobe.com/creative-cloud/kb/cc-cleaner-tool-installation-problems.html
• Adobe Support Community — Installation & Licensing Issues
https://community.adobe.com
• YouTube (Referenced walkthrough, adapted and expanded)
https://www.youtube.com/watch?v=2z5JSjEvWlk