


Affiliate disclosure: This article contains affiliate links. If you click and purchase, we may earn a commission at no extra cost to you.
Table of Contents
◉ Motion graphics templates, explained (and why they’re different from “just titles”) ◉ Set yourself up for fast, consistent results ◉ Step-by-step: add motion graphics templates in Premiere Pro ◉ When to use templates vs custom motion graphics ◉ Pros, cons, and how to avoid the common risks ◉ Mini case study: a 30-second SaaS product teaser (done in under an hour) ◉ Common mistakes (and expert fixes) ◉ FAQ ◉ Conclusion: build a motion workflow you can repeat
Video is no longer a “nice to have” in business and creator workflows—it’s the default. In Wyzowl’s 2025 survey, 89% of businesses said they use video as a marketing tool (Wyzowl, 2025). That adoption level creates a new problem: when everyone is publishing video, the difference between “watchable” and “professional” often comes down to polish—titles that animate smoothly, lower thirds that reinforce credibility, and transitions that feel intentional rather than chaotic fast.
The catch is time. Custom motion graphics built from scratch can be slow, especially if you’re not living in After Effects every day. The good news: you can add high-quality motion graphics inside Adobe Premiere Pro using Motion Graphics templates (often called “MOGRTs”), including templates you keep locally and templates you browse and license from Adobe Stock. Done right, this workflow lets you ship consistent, on-brand graphics in minutes, not hours—without breaking your editing rhythm. It’s especially useful when you’re producing weekly content, client revisions, or paid ads where consistency matters as much as speed.
Don’t have Adobe Stock yet?
Grab high-quality motion graphics templates on Adobe Stock so you can follow this workflow step-by-step inside Premiere Pro.
Browse Adobe Stock TemplatesIn this tutorial, you’ll learn what MOGRTs are, how Premiere’s Essential Graphics workflow works, and a repeatable system for finding, customizing, licensing, and reusing motion graphics safely across projects.
Motion graphics templates, explained (and why they’re different from “just titles”)
Motion graphics are animated design elements—think kinetic typography, lower thirds, callouts, logo reveals, and animated overlays that add structure and visual hierarchy to your edit.
A Motion Graphics template packages motion design into a file editors can reuse. In Adobe’s terminology, these templates can bundle the animation plus the required assets (images, videos, pre-comps) while exposing only the controls you’re meant to change in Premiere Pro—like text, color, and layout (Adobe, 2024).
That’s the magic: you get the “crafted” feel of motion design while keeping editing-friendly controls.
Key terms you’ll see in Premiere Pro:
• Essential Graphics / Graphics Templates panel: where you browse, organize, and apply templates.
• MOGRT (.mogrt): the template file format most motion graphics templates use.
• Lower third: a text/graphic element that sits in the lower third of the frame (commonly used for names, titles, and context).
• Action safe / title safe: guides that help you keep critical text and logos away from the edges to avoid cropping on different displays.
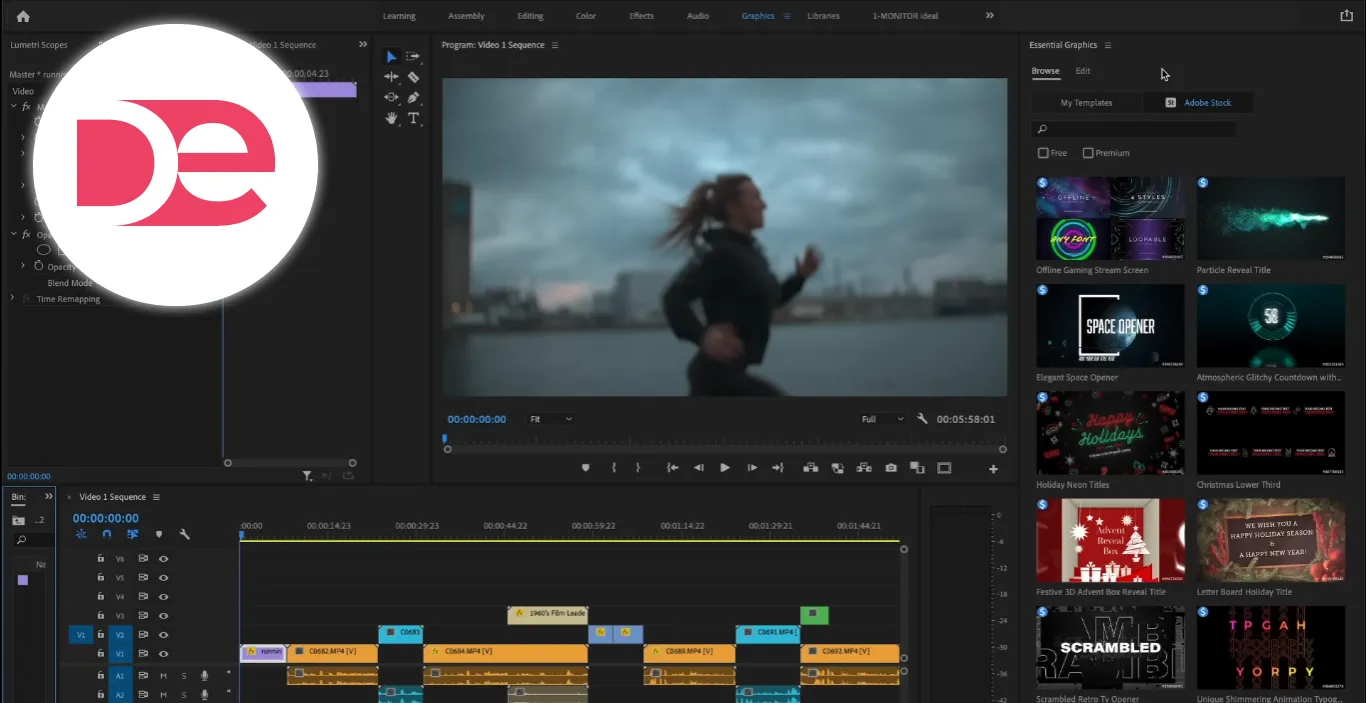
In the screenshot above, a clear view of the Graphics Templates panel helps you understand where templates live and how they’re organized—because finding the right panel quickly is half the battle when you’re editing on a deadline.
Set yourself up for fast, consistent results
Before you drag a single template into your timeline, take two minutes to prep. It prevents 20-minute detours later.
• Create a simple brand kit: primary font(s), two brand colors, and a “safe” neutral (white or near-white).
• Decide your title system: one opener style, one lower third style, one callout style, and one end card.
• Turn on safe margins (action safe/title safe) when you’re working with text-heavy overlays.
• Check your sequence resolution (1080p vs 4K vs vertical). Templates scale, but some look better in their native format.
• Know your deliverable: social, YouTube, broadcast, client review—each has different tolerance for aggressive motion.
A consistent template toolkit is what makes motion graphics feel like a “style,” not a random collection of effects.

Save hours: drop-in motion graphics that still look custom
Find polished MOGRT templates on Adobe Stock, preview fast, then license and customize them right inside Premiere Pro—without breaking your edit rhythm.
Get Adobe Stock TemplatesStep-by-step: add motion graphics templates in Premiere Pro
This workflow is designed for editors who want speed and control.
1) Open the right panel (and pick the right source)
In Premiere Pro, open the Graphics Templates panel (often grouped under Essential Graphics workflows). From there, you’ll typically see two useful areas:
• My Templates: anything you’ve saved locally or in your libraries.
• Adobe Stock: a searchable marketplace of motion graphics templates you can preview, license, and download.
Adobe’s own guidance is straightforward: browse Adobe Stock from the Graphics Templates panel, then drag-and-drop templates into your project for customization (Adobe, 2025).
2) Search like a pro (so you don’t scroll forever)
Searching “title” will give you thousands of options. Search with intent:
• Use function + style: “lower third minimal,” “title modern,” “callout clean,” “logo reveal simple.”
• Add your platform: “vertical,” “YouTube,” “podcast,” “webinar.”
• Add your mood: “corporate,” “cinematic,” “playful,” “tech.”
If you’re building a repeatable brand style, prioritize templates that share visual DNA (similar typography, line weights, and motion pacing).
A visual of search results makes it easier to spot what matters: thumbnail readability, animation preview cues, and whether the template looks like it matches your brand’s tone.
3) Preview and sanity-check customizability
Not all templates are equally editable. Some expose full text controls; others lock down design decisions.
Do a quick check before you commit:
• Look for editable text fields (names, titles, subtitles).
• Confirm whether colors are adjustable (especially accent lines and backgrounds).
• Verify whether you can swap logos or media placeholders.
• Make sure the motion feels right for your pacing (fast cuts usually need faster graphics).
If a template offers an “Info” view or preview option, use it. It’s faster than guessing and undoing.
4) Add the template to your timeline
Once you’ve chosen a template, drag it onto a track above your footage (typically a video track above your main clips). Treat it like any other layer:
• Place it where it should appear.
• Trim its in/out points to match your beat.
• Stack multiple graphics carefully—overlapping heavy animations can look chaotic fast.
5) License and download (without breaking your workflow)
If you choose a paid template, Premiere Pro can route you through licensing directly from the template workflow. Adobe’s documentation notes you can license a template by dragging it to your sequence or by using a “Buy License and Download” option in the panel (Adobe, 2025).
Risk-management mindset here matters:
• Keep a record of what you licensed (client name, project name, date).
• Avoid “license roulette”—don’t use unlicensed previews in deliverables.
• If you’re on a team, document where templates are stored so projects remain relinkable.
6) Customize the template (text, fonts, color, layout)
Select the template clip in your timeline, then switch to the editing controls for graphics. You’ll typically see controls for:
• Text: edit copy, capitalization, line breaks.
• Typography: font family, weight, size, tracking (letter spacing), and leading (line spacing).
• Color: text color, accent bars, background boxes, strokes.
• Layout: alignment, padding, safe-zone-friendly positioning.
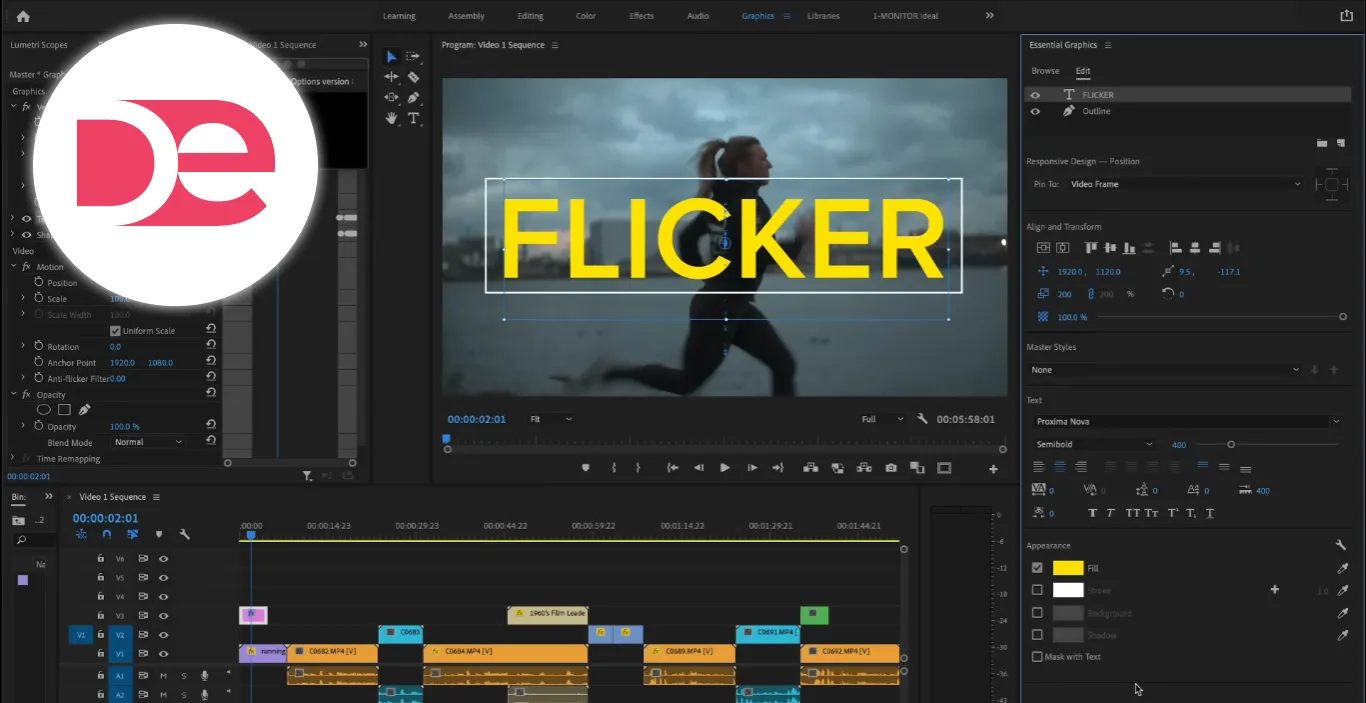
A close-up of the edit controls helps you understand what’s actually editable in a template—so you don’t waste time expecting a “locked” design to behave like a fully custom graphic.
7) Adjust timing so motion feels intentional
Templates often default to “one-size-fits-most” timing. You’ll get more professional results by syncing motion to your edit.
Practical timing rules:
• Give lower thirds enough on-screen time for a viewer to read comfortably.
• Avoid launching a graphic exactly on a cut unless it’s a deliberate design choice.
• If your template has an in/out animation, leave enough tail room for it to resolve cleanly.
8) Respect safe zones (and mobile cropping)
Even in 2025, people still watch video on everything from phones to TVs. Safe guides are still relevant, especially for text and logos.
• Keep critical text inside title safe whenever possible.
• For social crops, avoid placing key information near the bottom where UI elements may overlap.
When to use templates vs custom motion graphics
Templates are a workflow accelerator, not a replacement for thoughtful design. Use them when you need consistent polish quickly. Go custom when the design itself is a key differentiator.
| Approach | Best for | Speed | Flexibility | Typical tradeoff |
|---|---|---|---|---|
| Built-in / saved templates (My Templates) | Repeated series content, brand consistency | Fast | Medium | Style can feel repetitive if overused |
| Adobe Stock templates | High-quality variety, client deliverables | Fast | Medium | Licensing cost + selection time |
| Fully custom (After Effects) | Signature brand motion, complex scenes | Slow | High | Requires more skill + production time |
Pros, cons, and how to avoid the common risks
The upside
• Speed without sacrificing polish: drag, edit, ship.
• Consistency: a unified title system makes your videos feel “produced.”
• Lower skill barrier: you can get motion design results without building everything from scratch.
The limitations
• You can’t customize what isn’t exposed: templates only let you change the controls the designer enabled (Adobe, 2024).
• Licensing can become messy if you don’t document what you used.
• Generic-looking motion can flatten your brand if you never personalize templates.
Risk management checklist (use this for every client job)
• Create a “Graphics” folder in your project with the template names you used.
• Save your final variations to My Templates once they’re on-brand.
• Avoid using niche fonts unless your team has access to them.
• Test export early—some templates are heavier on effects and can slow playback.
Also note: some Motion Graphics templates may require After Effects installed to customize them, depending on how they were built (Adobe, 2024).
If a template behaves strangely or key controls are missing, that dependency is often the reason.
Mini case study: a 30-second SaaS product teaser (done in under an hour)
Imagine you’re cutting a short teaser for a new AI productivity tool. Your goal isn’t to impress with flashy motion—it’s to make the story clearer.
Here’s a template-driven structure that works:
• Opener (0–3 seconds): a clean animated title + subtle accent line.
• Context lower third (3–10 seconds): product name + one benefit.
• Feature callouts (10–22 seconds): two short callouts that appear near the UI you’re showing.
• End card (22–30 seconds): logo + URL + “Start free trial” or equivalent CTA.
How you apply templates without losing brand control:
• Choose a minimal lower third and set typography to your brand font.
• Map accent colors to your primary brand color.
• Keep animations short and consistent—avoid mixing three different motion “dialects.”
• Place text inside title safe and check readability at full size.
The result: a video that feels custom, even though you leveraged templates for most of the motion work.
Common mistakes (and expert fixes)
• Mistake: stacking too many animated elements at once
Fix: treat motion like seasoning—one primary animated element per beat.
• Mistake: using templates with mismatched typography
Fix: standardize fonts across your opener, lower thirds, and end card.
• Mistake: unreadable text over busy footage
Fix: add a subtle background bar or increase contrast; keep text shorter.
• Mistake: ignoring safe zones
Fix: turn on safe guides and keep important text away from edges.
• Mistake: licensing late (or not at all)
Fix: license before export and log what you used for auditability.
FAQ
Conclusion: build a motion workflow you can repeat
Motion graphics don’t need to be a separate production phase. When you treat templates as a controlled system—searched intentionally, customized thoughtfully, and reused consistently—you get the best of both worlds: speed and polish.
Start small today:
• Pick one lower third template and make it match your brand.
• Save it to My Templates.
• Use it in your next three videos and refine as you go.
Once you’ve built a tiny library of “default” motion graphics, you’ll spend less time fighting titles and more time shaping the story—where your real edge lives.
Explore Adobe Stock Motion Templates