


Affiliate disclosure: This article contains affiliate links. If you click and purchase, we may earn a commission at no extra cost to you.
Table of Contents
◉1. The Big Idea: Pattern to Fabric Without the “Sticker” Look ◉2. Preparing Your Pattern: Making and Saving a Seamless Tile ◉3. Expanding the Pattern on a Rectangle ◉4. Matching Perspective and Folds with Warp and Liquify ◉5. Why the Tutorial Skips Displacement Maps ◉6. Masking the Pattern to the Fabric Area ◉7. Blending the Pattern with Fabric Light and Shadow ◉8. Soften the Pattern to Match Fabric Texture ◉9. Refining the Global Mask Edges ◉10. Instantly Swapping Patterns with the Smart Object ◉11. Method Comparison: Why Warp + Curves Beats Simple Overlays ◉12. Mini Case Study: Building a 100-Design Fabric Mockup Library ◉13. Common Mistakes and Expert Tips ◉14. FAQ: Photoshop Pattern-to-Fabric Workflow ◉15. Conclusion: Turn One Photo into an Endless Mockup Engine
If you design textiles, run a print-on-demand store, or just love creating slick mockups for clients, you’ve probably hit the same wall: how do you wrap a flat pattern around real fabric folds without it looking fake?
A powerful, non-destructive workflow in Photoshop lets you do exactly that. You take a seamless pattern, map it to a blanket (or any textile), bend it with the folds, blend it with the light and shadow, and then reuse that setup to swap in hundreds of new designs with a couple of clicks.
Don't have Photoshop yet?
Get access to Photoshop so you can follow this fabric mockup workflow step by step and turn one photo into an endless pattern engine.
Get Photoshop to follow this tutorialIn this guide, we’ll turn that process into a detailed, step-by-step written playbook tailored for you. You’ll see how to:
• Build a reusable pattern “engine” with Smart Objects
• Match perspective and fabric folds using Warp and Liquify
• Use channels and Curves to blend the pattern into highlights and shadows
• Soften and refine the result so it looks like a real woven print
• Swap patterns instantly without redoing the hard work
By the end, you’ll have a production-ready workflow for realistic fabric mockups in Photoshop that you can reuse across projects, clients, and campaigns.
1. The Big Idea: Pattern to Fabric Without the “Sticker” Look
At a glance, applying a pattern to fabric might sound like a simple overlay: drop in a pattern layer, change the blend mode, and call it a day. But on a real blanket, dress, or curtain, the fabric is doing a lot of work:
• It has depth — peaks catching light and valleys falling into shadow
• It curves in multiple directions
• Threads and fibers soften the edges of the print
A basic overlay ignores all of this and ends up looking like a flat sticker.
The workflow described here solves that by combining four core Photoshop concepts:
• Seamless pattern – A small tile that can repeat endlessly with no visible seams.
• Smart Object – A container for layers that you can transform and edit non-destructively.
• Warp & Liquify – Tools that let you bend and nudge the pattern so it follows the fabric’s topology.
• Luminosity-based masking – Using the brightness of the original fabric image to drive where highlights and shadows appear on the pattern.

For example, you might apply a floral pattern to a throw blanket on a couch. The goal is to make the result look like it was truly printed onto the fabric, not pasted on top.
2. Preparing Your Pattern: Making and Saving a Seamless Tile
Before you touch the fabric photo, you need a pattern that tiles cleanly.
2.1 Check that your pattern is seamless
Open your pattern tile in Photoshop. To verify it’s seamless, use Pattern Preview:
1. Go to View → Pattern Preview.
2. Photoshop repeats your tile across the canvas so you can see how it behaves.
3. Zoom in to inspect the borders. If it’s truly seamless, you won’t see visible hard edges or misaligned lines at the tile borders.
If you notice seams, fix those first (using offset and cloning), or start from a pattern you know is seamless.
2.2 Save the pattern into Photoshop’s library
Once you’re happy with the tile:
1. Turn off View → Pattern Preview to return to normal view.
2. Go to Edit → Define Pattern….
3. Give the pattern a descriptive name (e.g., “Floral Throw – PiX”).
4. Click OK.
Photoshop now treats this tile as a reusable pattern you can apply to shapes and layers.
3. Expanding the Pattern on a Rectangle
Now switch to your target image — for example, a photo of a throw blanket draped over a sofa.
You don’t apply the pattern directly to the blanket pixels. Instead, you:
1. Create a rectangle roughly matching the fabric area.
2. Fill that rectangle with your saved pattern.
3. Convert it to a Smart Object so you can warp it later.
3.1 Draw a shape that covers the fabric
1. Select the Rectangle Tool.
2. In the Options bar, set the Fill to any solid color initially.
3. Draw a rectangle that covers the blanket area. It’s okay (and recommended) to make it slightly larger than the blanket so you have some margin for warping.
3.2 Fill the shape with your saved pattern
With the rectangle still selected:
1. In the Options bar, click the Fill swatch.
2. Switch from Solid Color to Pattern (the icon with a grid).
3. In the pattern picker, choose the pattern you defined earlier.
4. Adjust Scale; a good starting point is around 20%, but your value will depend on your image resolution and desired print size. You can also tweak Angle if the pattern needs to be rotated.
At this point you have a rectangle whose fill is the repeating pattern.
3.3 Convert the pattern rectangle to a Smart Object
To make the pattern editable and reusable:
1. Right-click the rectangle layer in the Layers panel.
2. Choose Convert to Smart Object.
3. Optionally rename it to something like Pattern – Throw.
From now on, every transform, warp, or blur you apply will remain editable.

4. Matching Perspective and Folds with Warp and Liquify
This is where the magic happens: you’ll bend the pattern so it rides the curves of the blanket instead of floating on top.
4.1 Lower the opacity so you can see the fabric
To align the pattern with the underlying blanket:
1. Select the Smart Object layer.
2. Lower Opacity to around 40% in the Layers panel.
Now you can see both the pattern and the original fabric folds at the same time.
4.2 Use Warp for the big flows and bends
1. Press Ctrl/Cmd + T to activate Free Transform.
2. Right-click inside the transform box and choose Warp.
You’ll see a grid with control points on the corners and edges.
Start with the broad flows:
• Drag corner and edge handles so the pattern roughly follows the blanket’s perspective.
• Think about the major direction of the folds; move points up/down or left/right so lines in the pattern curve with the fabric.
Add a horizontal split for large bends
In newer Photoshop versions, Warp includes Split controls in the Options bar:
1. Click the horizontal split icon.
2. Click on the warp grid roughly where the blanket bends.
This adds a new row of warp handles, letting you bend part of the pattern independently to follow a major fold or bend in the blanket.
Add vertical splits for local folds
To capture smaller vertical folds:
1. Click the vertical split icon.
2. Add a split just to the left of a visible fold.
3. Add another split just to the right of that fold.
Now you can:
• Push the left side in one direction.
• Push the right side in the opposite direction.
This simulates the fabric folding in on itself, making the pattern compress in the valley and stretch on the peak.
Repeat this for a few key folds, but don’t overdo it. Subtlety sells realism.
When you’re satisfied, press Enter/Return to apply the warp.
4.3 Refine micro-folds with Liquify
Warp gets you 80% of the way there. For finer irregularities, use Liquify:
1. With the pattern Smart Object selected, go to Filter → Liquify….
2. On the right, enable Show Backdrop and choose the background layer so you can see the blanket underneath. Set the backdrop Opacity to roughly 50%.
3. Make sure Backdrop is set to show behind the current layer.
Choose the Forward Warp Tool inside Liquify and:
• Use a moderate brush size matching the width of your folds.
• Keep Pressure on the lower side to avoid harsh distortions.
• Nudge pattern edges gently around smaller wrinkles and irregularities.
You’re not redrawing the blanket, just adding a bit of natural wobble so the pattern doesn’t look perfectly mathematically warped.
Click OK to apply the Liquify adjustments.

Map patterns to real fabric folds in minutes with Photoshop
Skip flat overlays and build a reusable Photoshop setup that bends your patterns with Warp and Liquify, blends them with Curves, and lets you swap designs in seconds for blankets, pillows, and apparel.
Start this Photoshop workflow5. Why the Tutorial Skips Displacement Maps
If you’ve done mockups before, you might be wondering: why not just use a displacement map?
Photoshop’s Displace filter (Filter → Distort → Displace) uses a grayscale map to push pixels around, theoretically making the overlay follow contours in the base image.
If you test this approach with a prepared displacement map and crank up the settings to visualize the effect, the result is often:
• Some areas bend correctly.
• Others shift unpredictably, creating weird artifacts and distortions.
• Fine folds and edges don’t line up the way you expect.
For complex, organic folds like a draped blanket, displacement maps tend to be:
• Less predictable
• Harder to fine-tune
• More prone to visual glitches
The Warp + Liquify approach may be more manual, but it gives you precise control over where and how the pattern bends.
6. Masking the Pattern to the Fabric Area
Right now, your pattern probably spills over everything, not just the blanket. You need a clean mask so it only affects the fabric.
6.1 Group the pattern for flexible masking
First, put the pattern Smart Object into a group:
1. Select the pattern layer.
2. Press Ctrl/Cmd + G.
You’ll get a new group (rename it to Pattern Application). This group will hold:
• The pattern Smart Object
• All blending adjustments and Curves layers
• A single mask controlling the overall area
Turn the group visibility off for a moment so you can see the original blanket clearly.
6.2 Create a selection of the blanket
On the original background photo:
1. Use the Object Selection Tool or Quick Selection Tool to select the blanket.
2. Add or subtract areas as needed:
• Hold Shift to add to the selection.
• Hold Alt/Option to subtract (useful for removing the floor or furniture).
3. Don’t worry about perfection yet; you can refine the mask later.
6.3 Apply the selection as a mask to the group
1. Turn the Pattern Application group visibility back on.
2. With the group selected and your blanket selection still active, click the Add Layer Mask icon at the bottom of the Layers panel.
Now the pattern is limited to the blanket region only.

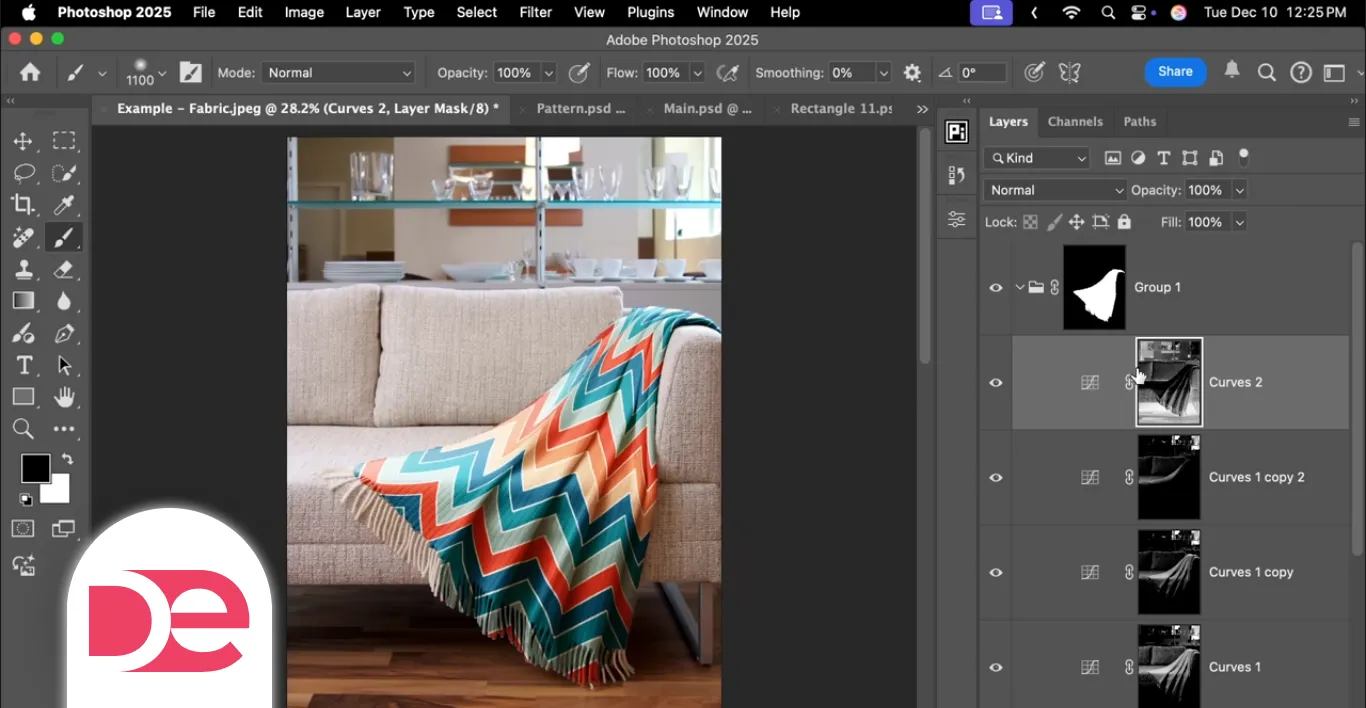
7. Blending the Pattern with Fabric Light and Shadow
So far, the pattern follows the folds but still feels pasted on. To sell the illusion, you need to integrate it with the blanket’s lighting.
7.1 Start with the right blend mode
Inside the Pattern Application group:
1. Select the pattern Smart Object layer.
2. Change its Blend Mode from Normal to Multiply.
Multiply makes the pattern darken the underlying fabric, letting highlights and shadows from the original photo show through.
But to really match the luminance, you’ll use channel-based selections and Curves.
7.2 Brighten the highlights using an RGB channel selection (first Curves layer)
You want the pattern to appear brighter where the blanket is brighter.
1. Temporarily solo the group:
• Hold Alt/Option and click the group’s eye icon.
2. Go to the Channels panel.
3. Ctrl/Cmd + click the RGB thumbnail.
This loads a luminosity selection: bright areas are selected more strongly than dark areas.
4. Return to the Layers panel.
5. Inside the Pattern Application group, make sure you’re above the pattern layer.
6. Click the Create New Fill or Adjustment Layer icon and choose Curves.
Photoshop creates a Curves layer with the luminosity selection as its mask.
7. Double-click the Curves icon to open properties.
8. Gently pull the curve upwards to brighten the selected highlight regions.
This makes the printed pattern respond to the same highlight structure as the original blanket.
Refine the highlight mask with Levels
To focus the effect on the brightest areas:
1. Select the mask of this Curves layer.
2. Press Ctrl/Cmd + L to open Levels.
3. Move the black slider to the right to darken midtones in the mask (reducing the effect there).
4. Adjust the white slider to emphasize the very brightest areas.
Click OK and toggle the Curves layer on and off to compare before/after.
7.3 Amplify highlights with additional Curves (optional)
If you want more punch:
1. Duplicate the highlight Curves layer with Ctrl/Cmd + J.
2. On the duplicated Curves, drag the center of the curve higher for a stronger brightening effect.
3. Again, refine the mask with Levels if needed so you don’t wash out broad areas.
4. Reduce Opacity (e.g., ~50%) to keep it believable.
You can also paint on the mask with a soft black brush to limit extra-brightening to specific regions (e.g., a central fold catching more light).
7.4 Deepen shadows for more depth (dark Curves layer)
Now you need to reinforce the dark valleys in the fabric.
1. Solo the group again if needed (Alt/Option + click eye).
2. In the Channels panel, Ctrl/Cmd + click the RGB thumbnail to load the luminosity selection again.
3. Invert it with Ctrl/Cmd + Shift + I.
Now darker areas are selected more strongly.
4. Turn all layers back on if they were soloed.
5. At the top of the Pattern Application group, add another Curves adjustment layer.
6. Pull the curve down to darken the shadows.
As with highlights, you can refine the mask:
• Use Levels (Ctrl/Cmd + L) on the mask to concentrate the effect on the deepest shadows.
• Optionally use Curves (Ctrl/Cmd + M) for more advanced control of the mask shape.
This combination—bright highlight Curves plus dark shadow Curves—makes the pattern look like it’s genuinely interacting with the blanket’s 3D form.
8. Soften the Pattern to Match Fabric Texture
Real printed textiles are not razor sharp. The weave, camera focus, and motion all soften edges slightly.
To mimic that:
1. Select the pattern Smart Object layer.
2. Go to Filter → Blur → Gaussian Blur….
3. Apply a small radius (around 2 px, but adjust based on your image size).
You want just enough blur to take the digital edge off the pattern so it blends into the softness of the fabric beneath.
9. Refining the Global Mask Edges
Now that the pattern looks realistic, zoom in and inspect the boundary where the blanket meets the background.
1. Select the mask on the Pattern Application group.
2. Use a soft Brush with:
• Black to hide pattern in areas where it shouldn’t appear (e.g., spilling onto the floor or furniture).
• White to restore the pattern where it was unintentionally removed.
Go slowly around:
• Tassels or fringe at the edges
• Places where fabric overlaps other objects
• Any thin or transparent threads
You can decide whether to keep extremely thin strands patterned or to simplify the design by masking them out entirely.
10. Instantly Swapping Patterns with the Smart Object
Here’s the productivity payoff: once the warp, Liquify, masks, and blending are all set, you never have to redo them for new patterns.
10.1 Edit the Smart Object contents
1. In the Layers panel, double-click the thumbnail of the pattern Smart Object.
2. Photoshop opens the Smart Object in a separate window. Inside you’ll see the original rectangle filled with your first pattern.
With the Rectangle Tool active:
1. Click the Fill swatch in the Options bar.
2. Choose a different pattern from your pattern library.
3. Adjust Scale and Angle as desired.
10.2 Save and update the master mockup
1. Press Ctrl/Cmd + S to save the Smart Object.
2. Switch back to your main mockup document.
Photoshop automatically updates the pattern everywhere it appears — with all the warps, folds, light/shadow blending, and blur intact.
This is why starting with a “neutral” pattern (like a grid or checker) can be useful: it makes it easier to judge distortion while you’re building the effect. Then you can swap it for final production designs later.
11. Method Comparison: Why Warp + Curves Beats Simple Overlays
Here’s a quick comparison of common approaches to applying patterns to fabric:
| Method | Control Over Folds | Light/Shadow Integration | Reusability for New Patterns | Risk Level / Artifacts |
|---|---|---|---|---|
| Simple overlay + Multiply | Low – no custom bending | Medium – relies only on blend mode | Medium – pattern can be swapped | Low artifacts but very “flat” look |
| Displacement map | Medium – depends on displacement | Medium – can follow depth somewhat | Low – hard to reuse cleanly | High risk of weird distortions |
| Warp + Liquify + Curves | High – precise fold control | High – highlight/shadow driven by image | Very high – swap pattern in Smart Object | Low artifacts if done carefully |
This tutorial’s workflow is squarely in the third column: more setup work up front, but vastly more control and reuse.
12. Mini Case Study: Building a 100-Design Fabric Mockup Library
Imagine you run a print-on-demand store selling throw blankets.
You have:
• One professionally shot lifestyle photo of a blank blanket on a sofa.
• Dozens (or hundreds) of pattern designs you want to showcase.
Using the workflow above:
1. Build a master PSD
• Apply your first pattern using the Smart Object, Warp, Liquify, and Curves steps.
• Dial in the edges and blur so it looks production-ready.
2. Save that master as a template
• Keep the Pattern Application group intact.
• Optionally color-label it or lock background layers to avoid accidental edits.
3. Create new variations by swapping patterns
• Duplicate the PSD for each new collection or product line.
• Open the Smart Object and change the pattern fill.
• Save, export, and you’ve just produced a new “real” product photo.
In an afternoon, you can generate an entire catalog of consistent, on-brand mockups without reshooting any photos. For e-commerce operators, that’s the difference between updating once a season and testing new designs weekly.
13. Common Mistakes and Expert Tips
13.1 Frequent mistakes to avoid
• Using a non-seamless pattern
Seams or mismatched edges will be magnified when you warp and liquify, making them harder to hide. Always verify with Pattern Preview first.
• Forgetting to convert to Smart Object
If you warp and liquify a regular layer, you’ll need to redo everything when you change the pattern. Smart Objects keep that work reusable.
• Warping at 100% opacity
It’s much harder to match folds when you can’t see them. Drop opacity while transforming so the underlying blanket guides you.
• Applying adjustments outside the group
Highlight and shadow Curves should live inside the Pattern Application group so they only affect the pattern, not the entire photo.
• Over-sharpening or over-blurring
Patterns that are too crisp feel fake; patterns that are too soft look “muddy.” Always match the softness of the original fabric detail.
• Overdoing Liquify
Extreme warping can introduce unnatural stretching or bending. Keep your Liquify moves small and reversible.
13.2 Pro tips to streamline your workflow
• Start with a check pattern for alignment
Grids and checkers make it much easier to see distortion, helping you fine-tune Warp and Liquify before you swap in complex prints.
• Use keyboard shortcuts aggressively
• Ctrl/Cmd + T for transform/warp
• Ctrl/Cmd + click RGB for luminosity selection
• Ctrl/Cmd + J to duplicate Curves layers
• Ctrl/Cmd + L/M to tweak masks with Levels or Curves
• Consider color tweaks on the pattern
Sometimes Multiply can make colors too dark or muted. Add a Hue/Saturation or Color Balance adjustment above the pattern layer (inside the group) to fine-tune color without affecting the rest of the image.
• Save your Pattern Application group as a starting point
Once you have a setup you like, drag that group into other fabric photos and re-warp the Smart Object to fit. You’ll carry over all your blending logic.
• Experiment with alternative blend modes for darker fabrics
For very dark or very light blankets, test Overlay or Soft Light in addition to Multiply, then adjust Curves layers to compensate.
14. FAQ: Photoshop Pattern-to-Fabric Workflow
15. Conclusion: Turn One Photo into an Endless Mockup Engine
This Photoshop workflow is more than a one-off trick. It’s a reusable system:
• A Smart Object rectangle that holds whatever pattern you want
• A carefully warped and liquified overlay that hugs fabric folds
• A set of Curves and masks driven by the original photo’s highlights and shadows
• A Gaussian Blur that matches textile softness
Once you’ve built it, you can swap patterns in seconds and repurpose the same logic across multiple photos. That’s ideal if you’re in e-commerce, surface design, or client work where variety and speed both matter.
Take one of your own fabric photos, follow the steps from creating a pattern to swapping designs, and save the result as your personal “pattern engine.” The next time you need a new mockup for a campaign or product launch, you won’t be starting from scratch—you’ll be loading in a new pattern and hitting save.
Get Photoshop and turn one photo into your mockup engine