


Affiliate disclosure: This article contains affiliate links. If you click and purchase, we may earn a commission at no extra cost to you.
Table of Contents
◉ Introduction ◉ What Text Effects in Premiere Pro Actually Do (And Why You Should Care) ◉ Overview of the 12 Premiere Pro Text Effects ◉ Step-by-Step: Rebuilding Each Text Effect in Premiere Pro ◉ Pros, Cons, and Risk Management When Using Text Effects ◉ Practical Example: Designing a Tech Channel Intro Sequence ◉ Common Mistakes and Expert Tips ◉ FAQ: Premiere Pro Text Effects ◉ Conclusion: Build Your Own Reusable Text FX Toolkit
If you’ve ever watched a slick YouTube intro or a polished trailer and wondered, “How did they get that text to look so good?”, this tutorial is for you. This guide walks you through 12 different text effects in Adobe Premiere Pro, all created with native tools—no third-party plugins required.
You’ll learn how to rebuild each effect from scratch, understand why it works, and adapt it to your own projects. We’ll cover everything from glowing titles and cinematic trailers to glitchy text, scrolling timelines, and a dramatic zoom-through transition that reveals your footage underneath.
Whether you’re editing for YouTube, TikTok, client promos, or your own brand, mastering a handful of reusable text setups gives you a huge edge. You’ll spend less time guessing in the Effects panel and more time applying reliable, good-looking animations that fit your style.
We’ll keep the language practical, connect key steps to clear step-by-step instructions, and highlight where you can push things further—so by the end, you’ll have your own small “text FX toolkit” inside Premiere Pro that you can reuse on almost any project.
Don’t have Premiere Pro yet?
Get access to Premiere Pro so you can follow every step in this text effects tutorial directly on your own timeline.
Get Premiere ProWhat Text Effects in Premiere Pro Actually Do (And Why You Should Care)
Text effects in Premiere Pro are combinations of:
• Essential Graphics settings (font, size, alignment, color)
• Built-in effects (like Drop Shadow, Transform, Crop, Directional Blur, etc.)
• Keyframes (animation over time for properties like position, scale, opacity)
• Masks and track mattes (to reveal or hide parts of a layer based on another layer)
Put together, these elements control three things:
• How your text looks (style and color)
• How it appears and disappears (animation)
• How it interacts with other layers (video behind text, text behind objects, reveals, etc.)
You don’t need motion graphics templates or After Effects to create impressive titles. With smart stacking of effects and thoughtful keyframing, you can get professional-level results entirely inside Premiere Pro.
Overview of the 12 Premiere Pro Text Effects
Here’s a quick overview of the 12 effects covered in this tutorial, along with their primary use cases:
| # | Effect Name | Primary Use Case |
|---|---|---|
| 1 | Glow Text Effect | Neon titles, gaming intros, energetic openers |
| 2 | Cinematic Trailer Text | Movie-style titles, dramatic promos |
| 3 | Burning Text Effect | Horror, action, “fiery” cinematic sequences |
| 4 | Text Behind Object | 3D-style depth, cinematic parallax in live-action |
| 5 | Write-On Text Effect | Handwriting looks, signature or notes |
| 6 | Fade In & Out Text | Simple, elegant titles and lower thirds |
| 7 | Slice Text Effect | Dynamic, edgy split text for promos |
| 8 | Stretch Popup Text | Bouncy UI-style labels, callouts |
| 9 | Glitch Text Effect | Tech, cyberpunk, gaming aesthetics |
| 10 | Reveal Text Effect | Masked reveals for titles with strong motion |
| 11 | Scrolling Text Animation | Timelines, credits, or date sequences |
| 12 | Zoom Through Text Effect | Transition from text into underlying footage |
We’ll now go through each one in detail.

Speed up your Premiere Pro text animations
Unlock full access to Premiere Pro so you can rebuild all 12 text effects, save them as presets, and drop them onto any title in just a few clicks.
Try Premiere Pro on your next editStep-by-Step: Rebuilding Each Text Effect in Premiere Pro

1. Glow Text Effect
This effect creates a soft, colored glow around your text using stacked Drop Shadow effects and a Tint effect.
1. Create your text
• Select the Type Tool and add your title.
• In the Essential Graphics panel, customize the font, size, and alignment.
• Set the Fill color to pure white (this is important for the Tint step later).
2. Add multiple Drop Shadows
• In the Effects panel, search for “Drop Shadow” and apply it to your text layer.
• In Effect Controls:
• Shadow Color: White
• Opacity: 50%
• Distance: 0
• Softness: 10
3. Stack the glow
• Copy the Drop Shadow (Ctrl + C) and paste (Ctrl + V) several times.
• For each new copy, increase Softness progressively, for example:
• 50 → 100 → 200 → 400 → 1000
The stacked softness values create a thick, glowing aura around your text.
4. Color the glow
• Search for the “Tint” effect and apply it to the same text layer.
• Make sure Tint is above all Drop Shadows in Effect Controls.
• Map White to your desired glow color (e.g., cyan, magenta, neon green).
In the image below, you could show a dark background with white text glowing in a bold cyan color to visualize how the stacked shadows work.
Pro tip: Because this is just Drop Shadow softness, you keep full control over glow intensity and performance overhead without resorting to heavy third-party plugins.
2. Cinematic Trailer Text Effect
This effect combines a slow scale animation and a traveling opacity mask to create a movie-trailer-style reveal.
1. Set up the text layers
• Add your main title with the Type Tool.
• Customize font and style in Essential Graphics.
• Optionally, duplicate the text to create a secondary line beneath, with a smaller font or alternate style.
2. Center and animate the scale
• Select the text layer(s) and, in Effect Controls, under Motion, center the text on screen.
• Move the playhead a bit forward and create a Scale keyframe.
• Go back to the start and increase the Scale value so the text starts slightly zoomed in, then settles.
• Right-click the first scale keyframe → Ease Out.
• Right-click the second scale keyframe → Ease In.
• Open the scale graph and pull handles to create a smooth curve.
3. Add a traveling opacity mask
• Under Opacity, select the Pen Tool and draw a rectangle over the text, like a band.
• Feather the mask slightly for a soft edge.
• Click the Mask Path stopwatch.
• Move the mask across the text over time so the text gradually appears and then disappears as the mask travels.
This gives you that classic “light band revealing the title” look often used in trailers.
3. Burning Text Effect
This effect uses animated circles, Turbulent Displace, and track mattes to create a fiery outline that burns through the text.
1. Create a black video matte
• In the Project panel, create a New Item → Black Video.
• Place it on Video Track 3 and adjust the duration.
2. Add Circle and Turbulent Displace
• Apply “Circle” to the black video.
• Increase Radius so the white circle covers the whole text area.
• Keyframe Radius:
• At the start: 0 (invisible)
• At the end: large enough to cover the text area
• Apply “Turbulent Displace”:
• Amount: around 300
• Complexity: 10
• Evolution: around 50
This creates an organic, fiery displacement pattern.
3. Add and center your text
• Add a text layer on Video Track 2.
• Style and center it using Essential Graphics.
4. Use Track Matte Key (first pass)
• Apply “Track Matte Key” to the text layer.
• Set Matte to Video 3 (your black video).
• Check Reverse if needed so the text is revealed by the animated matte.
5. Soften edges with blur
• Alt-drag the black video up to duplicate it to Track 4.
• Apply “Gaussian Blur” to the duplicate (Blurriness ~100).
• Copy Track Matte Key from the original text and paste it to the duplicate text, pointing Matte to Video 4.
6. Create a fiery outline
• Duplicate black video two more times.
• On the topmost, apply “Invert” and slightly scale it down (~96%) to control outline thickness.
• Select these layers and Nest them (this becomes your wave/outline matte).
7. Add the burn color
• Duplicate the original text layer.
• Change its Fill color to orange.
• Delete extra Track Matte keys and set Matte to the Nested track (e.g., Video 5).
• Set Composite Using to Matte Luma and uncheck Reverse.
Now you have a text that looks like it’s burning on, with a glowing orange edge.
4. Text Behind Object Effect

This effect sells “depth” in your footage by making it look like text is physically behind an object in the scene.
1. Add and position your text
• Add your text and style it in Essential Graphics.
• Place it roughly where you want it to appear in your frame.
2. Prepare the mask
• Zoom into the Program Monitor to see details.
• Temporarily lower the text Opacity so you can clearly see the background object.
3. Draw a mask around the foreground object
• Under Opacity, choose the Pen Tool and carefully trace around the object that should be in front of the text (e.g., a person, building, or product).
• Check Inverted so the text is visible only in the areas not covered by the mask.
4. Animate the mask if the object moves
• Click the Mask Path stopwatch.
• Move forward a few frames at a time and adjust the mask points as the object moves.
• Repeat until the end of the clip.
5. Restore Opacity
• Once done, bring the text Opacity back to 100%.
In the image below, you’d show a person walking while the text appears to pass behind them, reinforcing the 3D feel.
5. Write-On Text Effect
This mimics the look of text being handwritten onto the screen.
1. Add your text
• Use the Type Tool and type your word or phrase.
• Style it in Essential Graphics, preferably with a script or handwritten font.
• Extend the duration to around five seconds.
2. Create a Transparent Video
• In the Project panel, create a Transparent Video item.
• Place it above the text layer.
3. Add Right On
• Apply the “Write-On” effect to the transparent video.
• In Effect Controls:
• Color: Red (easy to see while animating)
• Brush Size: Slightly larger than your text stroke
• Stroke Length: 5 seconds
• Brush Spacing: 0.01
4. Animate the brush position
• At the start of the transparent layer, click the Brush Position stopwatch.
• In the Program Monitor, drag the red dot to the starting point of your word.
• Move forward one frame at a time, dragging the dot to follow the letters as if you’re writing them.
5. Reveal the text using Track Matte
• Apply “Track Matte Key” to your text layer.
• Set Matte to the Transparent Video’s track.
• As the red brush paints over the letters, the text appears.
6. Fade In and Out Text Effect
This is a smooth linear wipe from left to right that later reverses to fade out.
1. Add your text and style it in Essential Graphics.
2. Apply Linear Wipe twice
• Search for “Linear Wipe” and apply it two times to the text layer.
3. First Linear Wipe: fade in
• Angle: –90°
• Feather: 750
• At the start of the text layer:
• Transition Completion: 100% (text fully hidden)
• Click the stopwatch.
• Move about three seconds forward:
• Transition Completion: 0% (text fully visible).
4. Second Linear Wipe: fade out
• Angle: same (–90°)
• Feather: 750
• At the moment the text is fully visible:
• Transition Completion: 0% (start)
• Move three more seconds forward:
• Transition Completion: 100% (text wiped out).
This produces a soft, cinematic fade in and fade out using just a single effect twice.
7. Slice Text Effect
This creates the illusion that your text is sliced into two pieces that move apart with shadows for depth.
1. Create the base text
• Add and style your text.
• Center it in the frame.
2. Add a mask to slice the text
• In Effect Controls, under Opacity, use the Pen Tool to draw a diagonal or horizontal mask across the text.
• Set Mask Feather to 0 for a clean cut.
3. Duplicate the layer
• Alt-drag the text layer upward to duplicate it.
• On the first layer, invert the mask so it shows one half.
• On the second layer, keep the original mask so it shows the other half.
4. Animate the two halves
• On each layer, keyframe Position under Motion a few seconds into the future.
• For layer one, move it slightly up and left.
• For layer two, move it slightly down and right.
5. Nest the top half for shadow
• Right-click the second text layer (for example, the upper or lower half) and choose Nest.
6. Add Drop Shadows to the nested slice
• Apply “Drop Shadow” to the nested layer.
• First shadow:
• Opacity: 100
• Direction: 155° (example angle)
• Distance: 25
• Softness: 20
• Copy and paste Drop Shadow.
• Second shadow:
• Distance: 50
• Softness: 120
7. Animate the shadow opacity
• Move the playhead to the first position keyframe.
• On the nested layer, keyframe Drop Shadow opacity values to 0.
• Move to the second position keyframe and set both shadow opacities to 100.
This gives you a sliced-apart text with shadows that appear as the pieces move, adding realism.
8. Stretch Popup Text Effect
This effect quickly stretches text wider and then snaps back, creating a bouncy popup feel.
1. Add your text and style it.
2. Apply Transform
• Search for “Transform” and apply it to the text layer.
• In Effect Controls, uncheck “Uniform Scale”.
3. Animate the width
• At the start of the text layer, keyframe Scale Width at a value of 1.
• Move three frames forward, change Scale Width to about 125.
• Move another three frames forward and set Scale Width back to 100.
4. Add motion blur
• Uncheck “Use Composition’s Shutter Angle” in Transform.
• Increase Shutter Angle to 360 for strong motion blur.
5. Reuse the effect
• Once you like the motion, copy the Transform effect and paste it onto other text layers to reuse the same stretch popup animation.
9. Glitch Text Effect
A minimal approach to a glitchy, chromatic-aberration style text.
1. Add your text layer to the timeline.
2. Apply VR Chromatic Aberration
• Search for “VR Chromatic Aberration” in the Effects panel.
• Apply it to the text layer.
3. Tweak the settings
• Aberration Red: 10
• Aberration Blue: 0
• Falloff Distance: 100
This creates a subtle RGB separation that looks like a digital glitch without being too heavy on the eyes.
10. Reveal Text Effect
A masked slide-up reveal with motion blur and a “go back” move for extra polish.
1. Add your text and style it.
2. Add Crop and Transform
• Apply “Crop” and “Transform” to the text layer.
• In Effect Controls, ensure Crop appears above Transform.
3. Create a crop window
• With Crop selected, drag the bottom crop handle in the Program Monitor until it sits just below your text.
• This creates a “window” for the reveal.
4. Animate position
• In Transform, click the Position stopwatch at the start with the text moved down out of sight.
• Increase the second Position value until the text is hidden behind the crop.
• Move one second forward and click the reset icon to restore the original Position (text fully visible).
5. Smooth the motion
• Select both position keyframes.
• Right-click → Ease In, then Ease Out.
• Expand the Position property and adjust the graph, dragging the second handle left to shape the curve.
6. Enable motion blur
• Uncheck “Use Composition’s Shutter Angle”.
• Set Shutter Angle to 360.
7. Add the “go back” animation
• A few frames after the first reveal, create a new Position keyframe.
• Move the playhead one second forward and Alt-drag the first keyframe to this time.
• Adjust the final keyframe’s graph handle to the right for a smooth “overshoot and settle” motion.
11. Scrolling Text Animation
Perfect for year timelines, credits, or historical sequences.
1. Create stacked text (e.g., years)
• Use the Type Tool and enter your first year.
• Press Enter for each new line (next year, etc.).
• Continue until you reach your final year.
2. Style and align
• Select all text (Ctrl + A) and adjust font, size, and color.
• Align the text center in Essential Graphics.
3. Position the starting point
• In Effect Controls, under Vector Motion, increase the second Position value to move the text down to where the first visible year should appear.
4. Create a rectangular mask
• Under Opacity, use the Rectangle Mask Tool to define a window where the text will be visible.
• Add a small feather if needed.
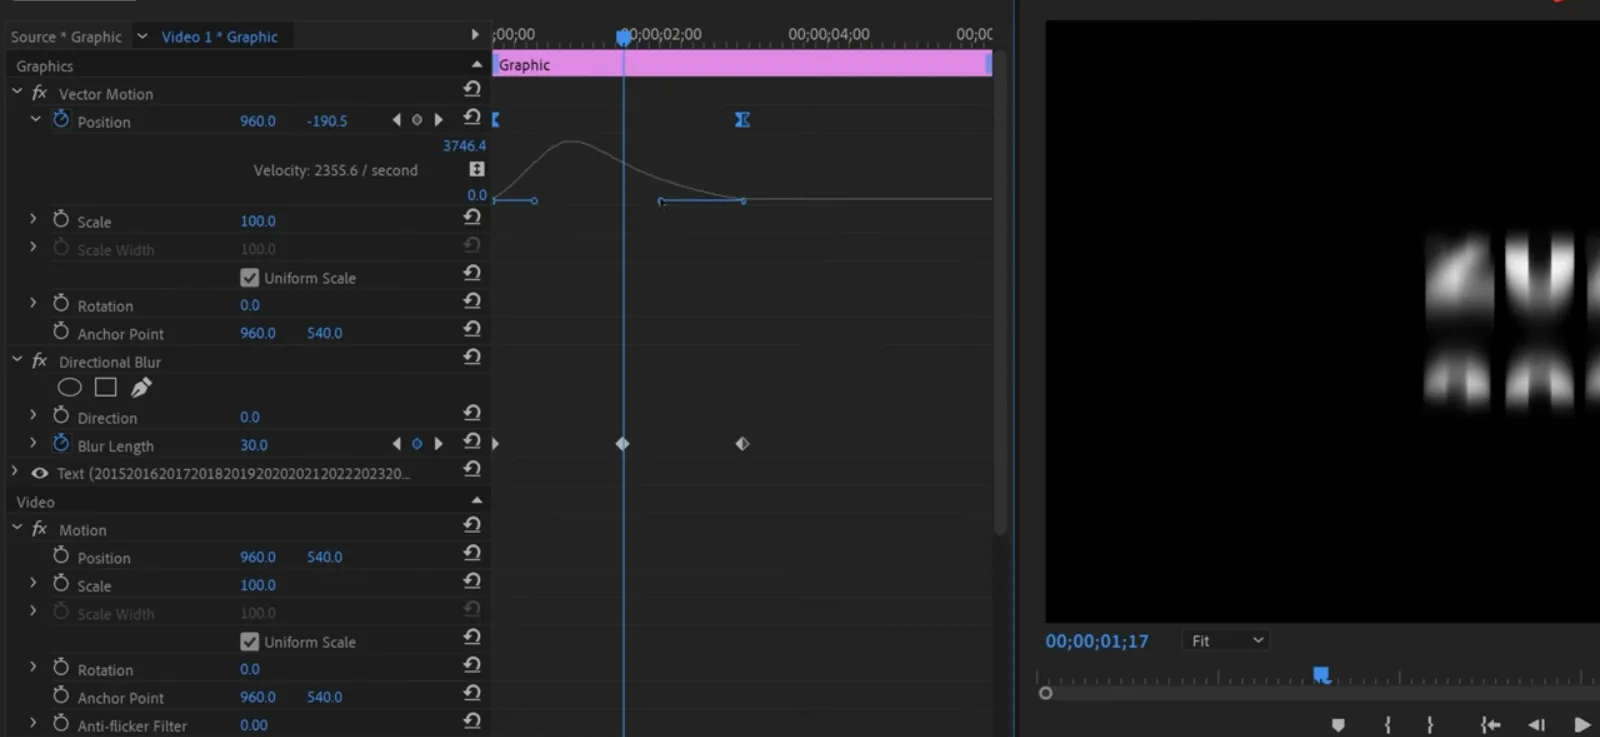
5. Add Directional Blur
• Apply “Directional Blur” to the text layer.
• You’ll animate blur amount later to enhance motion.
6. Animate the scroll
• At the start, keyframe Position and Blur Length (0 for blur).
• Move several seconds forward and adjust Position so the final year sits in the same “window” area.
• Adjust the mask’s position if needed so the text stays centered.
• At this point, create another Blur Length keyframe (0).
• Go to the middle of the animation and set Blur Length to 30 to add motion blur during the scroll.
7. Smooth the motion
• Select Position keyframes → Temporal Interpolation → Ease In, then Ease Out.
• Expand Position and adjust the second handle slightly left to ease the ending.
In the image below, you could show the timeline of years scrolling inside a mask window to clarify how the animation feels.
12. Zoom Through Text Effect
This turns your text into a transition that zooms the viewer into the underlying footage.
1. Set up the text
• Add your text and style it in Essential Graphics.
• Use the Selection Tool and double-click in the Program Monitor to expose the anchor point (small dot).
• Move the anchor to the area you want to zoom into.
2. Animate the scale
• In Effect Controls, expand Vector Motion.
• At the start, set a Scale keyframe at your normal size.
• Move several seconds forward and increase Scale until the screen is completely filled (or almost white from the text fill color).
3. Smooth the zoom
• Select both Scale keyframes → Ease In / Ease Out.
• Expand Scale and adjust the curve in the graph editor for a strong acceleration and smooth stop.
4. Turn it into a transition
• Move your text layer to Video Track 2.
• Place your underlying video on Video Track 1, aligned so the zoom ends right where you want the footage to start being visible.
• Apply “Track Matte Key” to the video layer.
• Set Matte to Video 2 (the text).
As the text scales up and fills the frame, the video becomes visible inside the text, creating a dynamic zoom-through transition.
Pros, Cons, and Risk Management When Using Text Effects
Pros
• Strong visual identity
• Increased viewer retention at the start of videos
• Professional “agency-like” polish using only native tools
• Reusable setups once you save them as presets or templates
Cons
• Overuse can distract from your message or footage.
• Some effects (like burning text or heavy glows) can be render-heavy.
• Poor font choices combined with complex effects can hurt readability.
Risk Management Tips
• Keep contrast high between text and background. If you’re adding glow or blur, check readability on smaller screens.
• Test render times: if your machine struggles, consider fewer stacked effects or shorter durations.
• Use adjustment layers or pre-comps (nesting) for complex stacks so you can disable them quickly while editing.
• Stick to 1–2 “signature” text looks per video to build brand consistency instead of using all 12 at once.
Practical Example: Designing a Tech Channel Intro Sequence
Imagine you’re building a new intro package for a tech YouTube channel:
• Open with the Glow Text Effect to show your channel name over a dark background.
• Cut to a quick Cinematic Trailer Text line like “New Reviews Every Week”.
• Use the Text Behind Object effect with a shot of a laptop or phone, making your text feel integrated into the scene.
• Add a Stretch Popup Text label near a product to highlight key specs.
• Transition into your main video using the Zoom Through Text Effect, zooming through the word “Review” or your logo into the actual footage.
By combining just 4–5 of these effects strategically, you can create a cohesive, professional intro that feels custom, even though it’s built with native Premiere tools.
Common Mistakes and Expert Tips
Common Mistakes
• Using too many effects at once
Your timeline becomes cluttered and your brand looks inconsistent.
• Forgetting effect order
For example, placing Tint below Drop Shadow in the Glow effect breaks the color mapping.
• Ignoring masks and mattes
Track Matte Key depends on the correct layer being chosen as the matte. Wrong track = confusion.
• No easing on keyframes
Linear animations feel robotic and cheap. You’re missing out on a huge boost in perceived quality.
• Skipping feathering
Hard edges on masks can make your text sit awkwardly on top of footage.
Expert Tips
• Turn pairs into presets
After you dial in effects like Glow, Stretch Popup, or Reveal, right-click the effect stack and Save Preset. This turns your work into a reusable library.
• Work with guides
Use safe margins and guides so your text animations stay visually consistent across sequences.
• Preview at 50% speed
Sometimes full-speed playback hides minor timing issues. Preview slowed down to tweak easing and timings.
• Use adjustment layers for experimentation
For global looks (like glows or color shifts) you can test them on an adjustment layer above the text before committing.
• Keep performance in mind
Stack your heavy effects (like multiple blurs or Turbulent Displace) only where they’re needed and consider rendering those sections.
FAQ: Premiere Pro Text Effects
Conclusion: Build Your Own Reusable Text FX Toolkit
You don’t need to be a motion designer—or rely on templates and plugins—to get impressive text in Premiere Pro. By combining a few core tools (masks, track mattes, Transform, Drop Shadow, blur, and easing), you can build 12 distinct text looks that cover most of what a modern creator needs: glows, cinematic intros, glitches, reveals, scrolling timelines, and transitions.
Your next step is simple:
• Pick 3–4 of these effects that fit your brand.
• Recreate them in a dedicated “Text FX Library” sequence.
• Save each as a preset so you can drag-and-drop them onto your titles.
Once you’ve done that, every new video you produce will start from a stronger visual baseline. You’ll spend less time reinventing text animations and more time focusing on storytelling, pacing, and content—the things that actually grow your audience.
Get Premiere Pro and build your text FX toolkit